Reading Additional notes on running ML jobs on Compute Canada clusters
GPU(s)
GPU types
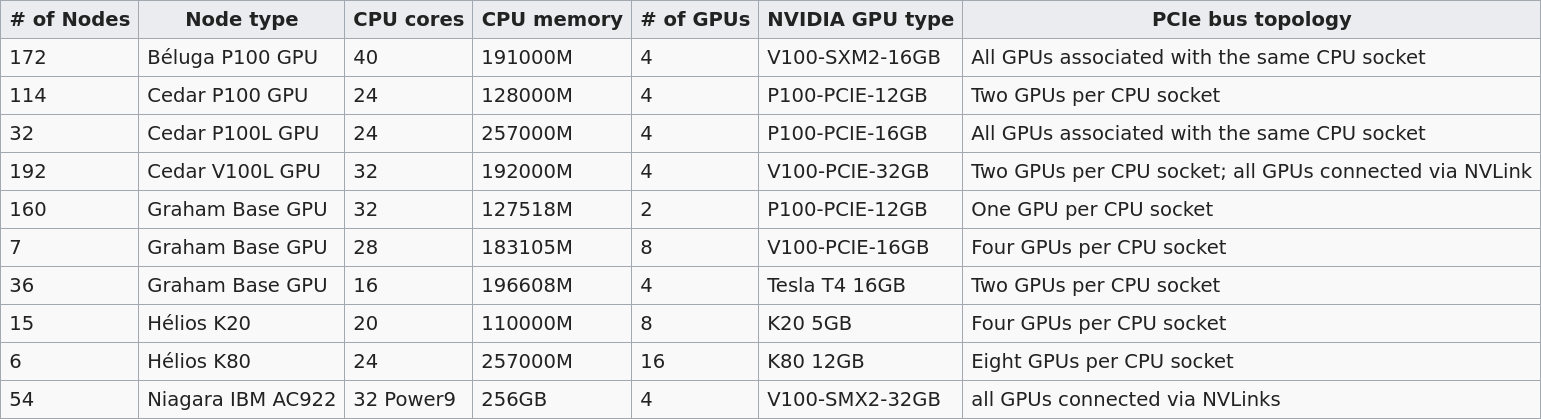
Several Compute Canada clusters have GPUs. Their numbers and types differ:
The default is 12G P100 , but you can request another type with SBATCH --gres=gpu:<type>:<number> (example: --gres=gpu:p100l:1 to request a 16G P100 on Cedar). Please refer to the Compute Canada Wiki for more details.
Number of GPU(s)
It is very likely that you do not need more than one GPU. Asking for more than you need will greatly increase your waiting time until your job is run. The lesson on distributed computing with PyTorch gives a few information as to when you might benefit from using several GPUs and provides some links to more resources. We will also offer workshops on distributed ML in the future. In any event, you should test your model before asking for several GPUs.
CPU/GPU ratio
Here are Compute Canada recommendations:
Béluga:
No more than 10 CPU per GPU.
Cedar:
P100 GPU: no more than 6 CPU per GPU.
V100 GPU: no more than 8 CPU per GPU.
Graham:
No more than 16 CPU per GPU.
Code testing
It might be wise to test your code in an interactive job before submitting a really big batch job to Slurm.
Activate your Python virtual environment
$ source ~/env/bin/activateStart an interactive job
Example:
$ salloc --account=def-<account> --gres=gpu:1 --cpus-per-task=6 --mem=32000 --time=0:30:0Prepare the data
Create a temporary data directory in $SLURM_TMPDIR :
(env) $ mkdir $SLURM_TMPDIR/dataNote: The variable $SLURM_TMPDIR is created by Slurm on the compute node where a job is running. Its path is /localscratch/<user>.<jobid>.0 . Anything in it gets deleted when the job is done.
Extract the data into it:
(env) $ tar xf ~/projects/def-<user>/<data>.tar -C $SLURM_TMPDIR/dataTry to run your code
Play in Python to test your code:
(env) $ python>>> import torch
>>> ...Note: if you want to exit the virtual environment:
(env) $ deactivateCheckpoints
Long jobs should have a checkpoint at least every 24 hours. This ensures that an outage won't lead to days of computation lost and it will help get the job started by the scheduler sooner.
For instance, you might want to have checkpoints every n epochs (choose n so that n epochs take less than 24 hours to run).
In PyTorch, you can create dictionaries with all the information necessary and save them as .tar files with torch.save() . You can then load them back with torch.load() .
The information you want to save in each checkpoint includes the model’s state_dict , the optimizer’s state_dict , the epoch at which you stopped, the latest training loss , and anything else needed to restart training where you left off.
Example:
Saving a checkpoint during training could look something like this:
torch.save({
    'epoch': <last epoch run>,
    'model_state_dict': net.state_dict(),
    'optimizer_state_dict': optimizer.state_dict(),
    'loss': <latest loss>,
}, <path/to/checkpoint-file.tar>)
To restart, initialize the model and optimizer, load the dictionary, and resume training:
# Initialize the model and optimizer
model = <your model>
optimizer = <your optimizer>

# Load the dictionary
checkpoint = torch.load(<path/to/checkpoint-file.tar>)
model.load_state_dict(checkpoint['model_state_dict'])
optimizer.load_state_dict(checkpoint['optimizer_state_dict'])
epoch = checkpoint['epoch']
loss = checkpoint['loss']

# Resume training
model.train()
TensorBoard on the cluster
TensorBoard allows to visually track your model metrics (e.g. loss, accuracy, model graph, etc.). It requires a lot of processing power however, so if you want to use it on a Compute Canada cluster, do not run it from the login node. Instead, run it as part of your job. This section guides you through the whole workflow.
Launch TensorBoard
First, you need to launch TensorBoard in the background (with a trailing &) before running your Python script. To do so, ad to your sbatch
script:
tensorboard --logdir=/tmp/<your log dir> --host 0.0.0.0 &Example:
#!/bin/bash
#SBATCH ...
...

tensorboard --logdir=/tmp/<your log dir> --host 0.0.0.0 &
python $SOURCEDIR/<script>.py $SLURM_TMPDIR/data
Create a connection between the compute node and your computer
Once the job is running, you need to create a connection between the compute node running TensorBoard and your computer.
First, you need to find the hostname of the compute node running the Tensorboard server. This is the value under NODELIST for your job when you run:
$ sqThen, from your computer, enter this ssh command:
[local]$ ssh -N -f -L localhost:6006:<node hostname>:6006 <user>@<cluster>.computecanada.ca(Replace <node hostname> by the compute node hostname you just identified, <user> by your user name, and <cluster> by the name of the Compute Canada cluster hostname—e.g. beluga, cedar, graham.)
Access TensorBoard
You can now open a browser (on your computer) and go to http://localhost:6006 to monitor your model running on a compute node in the cluster!
Running several similar jobs
A number of ML tasks (e.g. hyperparameter optimization) require running several instances of similar jobs. Grouping them into a single job with GLOST or GNU Parallel reduces the stress on the scheduler.