Reading Running ML jobs in Compute Canada clusters
Note on notation: expressions between the < and > signs need to be replaced by the relevant information (without those signs).
Prepare your script
Throughout your script, make sure to have plots written to file and not displayed on screen.
You can develop your script directly in the cluster using an interactive job, or on your local machine (working on your machine at this stage, using very little data and few epochs—only to develop and test the code—is a convenient approach).
Ultimately, you will submit your script to sbatch .
Prepare the data
The Compute Canada clusters are optimized for very large files and are slowed by large collections of small files. Datasets with many small files need to be turned into single-file archives with tar . Failing to do so will affect performance not just for you, but for all users of the cluster.
$ tar cf <data>.tar <path/to/dataset/directory>/*Notes:
- If you want to also compress the files, replace tar cf with tar czf
- As a modern alternative to tar , you can use Dar
Copy files to the cluster
Small files
If you need to copy files such as your script to the cluster, you can use scp .
From your computer
If you are in a local shell, run:
[local]$ scp </local/path/to/file> <user>@<cluster>.computecanada.ca:<path/in/cluster>(Replace <user> by your user name and <cluster> by the name of the Compute Canada cluster hostname (e.g. beluga, cedar, graham).)
From the cluster
If you are in a remote shell (through ssh), run:
[cluster]$ scp <user>@<cluster>.computecanada.ca:<cluster/path/to/file> </local/path>Data
Use Globus for large data transfers.
Load necessary modules
To use Python for ML on the cluster, you will need to load the relevant modules.
This is done with the Lmod tool through the module command. Here are some key commands:
# Get help on the module command
$ module help

# List modules that are already loaded
$ module list

# See which modules are available for Python
$ module avail python

# Load Python, CUDA, and cuDNN
$ module load python/3.8.2 cudacore/.10.1.243 cuda/10 cudnn/7.6.5
NVIDIA CUDA Deep Neural Network library (cuDNN) is a GPU-accelerated library of primitives for deep neural networks.
GPU(s)
GPU type
Several Compute Canada clusters have GPUs. Their numbers and types differ:
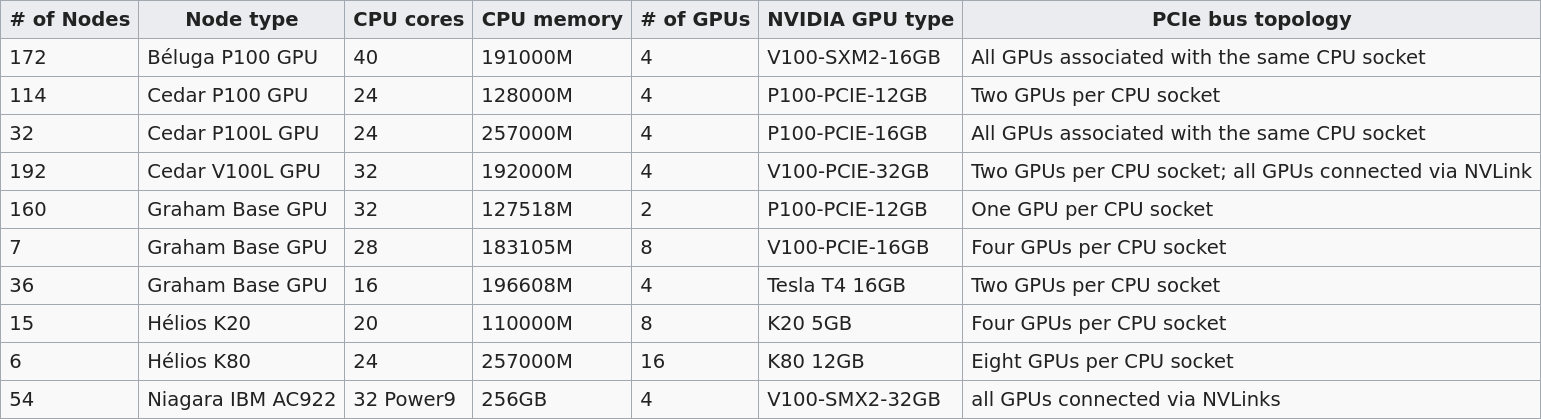
The default is 12G P100 , but you can request another type with SBATCH --gres=gpu:<type>:<number>
Number of GPU(s)
It is very likely that you do not need more than one GPU. Asking for more than you need will greatly increase your waiting time until your job is run. The session on distributed computing with PyTorch will help you see when you might benefit from several GPUs. In any event, you should test your model before asking for several GPUs.
CPU/GPU ratio
Here are Compute Canada recommendations:
Béluga:
No more than 10 CPU per GPU
Cedar:
P100 GPU: no more than 6 CPU per GPU
V100 GPU: no more than 8 CPU per GPU
Graham:
No more than 16 CPU per GPU
Install Python wheels and test your code
You also need Python packages.
For this, create a virtual environment on compute nodes (this improves I/O performance) in which you install packages with pip .
Do not use Anaconda
While Anaconda is a great tool on personal computers, it is not an appropriate tool when working on the Compute Canada clusters: binaries are unoptimized for those clusters and library paths are inconsistent with their architecture. Anaconda installs packages in $HOME
where it creates a very large number of small files. It can also create conflicts by modifying .bashrc
The variable $SLURM_TMPDIR is created by Slurm on the compute node where a job is running. Its path is /localscratch/<user>.<jobid>.0 . Anything in it gets deleted when the job is done.
It may be a good idea to run an interactive job to create a requirements file and test your code:
Start an interactive job
Example:
$ salloc --account=def-<user> --gres=gpu:1 --cpus-per-task=6 --mem=32000 --time=1:00Create a requirements file
Create a Python virtual environment:
$ virtualenv --no-download $SLURM_TMPDIR/envActivate it:
$ source $SLURM_TMPDIR/env/bin/activateUpdate pip:
(env) $ pip install --no-index --upgrade pipInstall the packages you need in the virtual environment:
(env) $ pip install --no-index torch torchvisionSave the requirements file:
(env) $ pip freeze > ~/<path/project/dir/>requirements.txtTry to run your code
Create a temporary data directory in $SLURM_TMPDIR :
(env) $ mkdir $SLURM_TMPDIR/dataExtract the data into it:
(env) $ tar xf ~/projects/def-<user>/<data>.tar -C $SLURM_TMPDIR/dataPlay in Python to test your code:
(env) $ python>>> import torch
>>> ...Note: if you want to exit the virtual environment:
(env) $ deactivateJob script
To submit a job to Slurm (the job scheduler used by the Compute Canada clusters), you need to write an sbatch script. Here is an example script:
#!/bin/bash
#SBATCH --job-name=<name>*			  # job name
#SBATCH --account=def-<user>
#SBATCH --time=<time>				  # max walltime in D-HH:MM or HH:MM:SS
#SBATCH --cpus-per-task=<number>      # number of cores
#SBATCH --gres=gpu:<type>:<number>    # type and number of GPU(s) per node
#SBATCH --mem=<mem>					  # max memory (default unit is MB) per node
#SBATCH --output=<file%j.out>*		  # file name for the output
#SBATCH --error=<file%j.err>*		  # file name for errors
					                  # %j gets replaced by the job number
#SBATCH --mail-user=<email_address>*
#SBATCH --mail-type=ALL*

# Load modules
module load python/3.8.2 cudacore/.10.1.243 cuda/10 cudnn/7.6.5

# Create variable with the directory for your ML project
SOURCEDIR=~/<path/project/dir>

# Create and activate a virtual environment on compute node
virtualenv --no-download $SLURM_TMPDIR/env
source $SLURM_TMPDIR/env/bin/activate

# Install Python packages
pip install --no-index -r $SOURCEDIR/requirements.txt

# Transfer and extract data
mkdir $SLURM_TMPDIR/data
tar xf ~/projects/def-<user>/<data>.tar -C $SLURM_TMPDIR/data

# Run Python script on the data
python $SOURCEDIR/<mlscript>.py $SLURM_TMPDIR/data
Notes:
- If you compressed your data with tar czf , you need to extract it with tar xzf
- SBATCH options marked with a * are optional
- There are various other options for email notifications.
Job handling
Submit job
$ cd </dir/containing/job>
$ sbatch <jobscript>.sh
Check job status
$ sq
PD
= pending
R
= running
Cancel job
$ scancel <jobid>Display efficiency measures of completed job
$ seff <jobid>Checkpoints
Long jobs should have a checkpoint at least every 24 hours. This ensures that an outage won't lead to days of computation lost and it will help get the job started sooner by the scheduler.
For instance, you might want to have checkpoints every n epochs (choose n so that n epochs take less than 24 hours to run).
In PyTorch, you can create dictionaries with all the information necessary and save them as .tar files with torch.save() . You can then load them back with torch.load() .
The information you want to save in each checkpoint includes the model’s state_dict, the optimizer’s state_dict, the epoch at which you stopped, the latest training loss, and anything else needed to restart training where you left off.
Example:
Saving a checkpoint during training could look something like this:
torch.save({
    'epoch': <last epoch run>,
    'model_state_dict': net.state_dict(),
    'optimizer_state_dict': optimizer.state_dict(),
    'loss': <latest loss>,
}, <path/to/file.tar>)
To restart, initialize the model and optimizer, load the dictionary, and resume training:
# Initialize the model and optimizer
model = <your model>
optimizer = <your optimizer>

# Load the dictionary
checkpoint = torch.load(<path/to/file.tar>)
model.load_state_dict(checkpoint['model_state_dict'])
optimizer.load_state_dict(checkpoint['optimizer_state_dict'])
epoch = checkpoint['epoch']
loss = checkpoint['loss']

# Resume training
model.train()
Running several similar jobs
A number of ML tasks (e.g. hyperparameter optimization) require running several instances of similar jobs. Grouping them into a single job with GLOST or GNU Parallel reduces the stress on the scheduler.
Using TensorBoard in the cluster
If you want to visually track your model metrics (e.g. loss, accuracy, model graph, etc.) with TensorBoard, you need to launch it in the background (using & ) before your python script by adding to your sbatch script:
tensorboard --logdir=/tmp/<your log dir> --host 0.0.0.0 &So our example script would look like:
#!/bin/bash
#SBATCH ...
...

tensorboard --logdir=/tmp/<your log dir> --host 0.0.0.0 &
python $SOURCEDIR/<mlscript>.py $SLURM_TMPDIR/data
Once the job is running, you need to create a connection between the compute node running TensorBoard and your computer.
First, you need to find the hostname of the compute node running the Tensorboard server. This is the value under NODELIST for your job when you run:
$ sqThen, from your computer, enter this ssh command:
[local]$ ssh -N -f -L localhost:6006:<node hostname>:6006 <user>@<cluster>.computecanada.ca(Replace <node hostname> by the compute node hostname you just identified, <user> by your user name, and <cluster> by the name of the Compute Canada cluster hostname (e.g. beluga, cedar, graham).)
You can now open a browser and go to http://localhost:6006.
Note: TensorBoard requires a lot of processing power. Please do not run it from the login node. Only run it in a job.